Flower #1
This first flower, is really easy to make but it looks so pretty. I love it when I can get a lot of bang out of something so simple! This flower reminds me of a happy little bow on top of a beautifully wrapped present. That is probably why I like it so much. ( I LOVE gifts!)
Enough rambling, I will get to the tutorial. I cut a three inch strip off of the long side of the felt. The wider the strip, the longer the loops you will have. Once the strip was cut, I ran a line of hot glue down the cut edge and folded the piece in half, lengthwise.
Side note:
On another flower I tried a wider strip
thinking that it would make a fuller
flower. It did make longer loops, but
they were too long and just flopped
over instead of making the flower fuller.
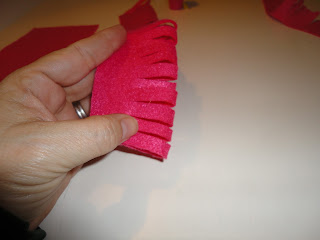
The next step is to cut a fringe on the folded side of the felt. I cut them about a 1/4 in apart. These strips will be your petals, so you can play with the width and it would change the look of the flower.
Once the fringe is cut, I just put a drop of glue at one end.
Then you just roll the strip, adding drops of glue as you go along.
You can see a little evidence of my impatience here. I started putting a line of glue and rolling so I wouldn't have to keep putting down and picking up the glue gun and camera. The only difference in a dot of glue or a line of glue is your speed. If you make a line of glue, you have to roll quickly or the hot glue will cool off and harden up before you want it to.
This is what the bottom of the flower will look like when you are finished rolling.
Here it is! A cute little felt flower.
Here is another one that I made in a different size, just be cutting a smaller strip off the length of the felt to begin with, and cutting the fringe a little closer together.
I hope you enjoy making these little flowers as much as I do. I have made some of them for headbands and brooches too. They are so easy, and add such a great personal touch.
This project is on these link parties:


thanks for leaving a comment on my wreath! i really like your felt flowers, i may have to try some of those!!
ReplyDeletedon't you just love felt! gret flowers.
ReplyDeletemegan
craftycpa.blogspot.com
Those are SO cute! Thanks for the tutorials.
ReplyDeleteThank you so much as well for following Flip Flop Reviews. I'm following you back. :) Have a great night!
-Danielle
www.flipflopreviews.blogspot.com
THanks for following... I am following back. I am not sure I would have the paitence to make these flowers. LOL...looks like a lot of steps!
ReplyDeleteFollowing you back! Great photos in your tutorial. laura
ReplyDeletehttp://imnotatrophywife.com
I never imagined something that easy made that! Amazing.
ReplyDeletepretty flowers but tell from where to buy felt sheet ,from which kind of shop like grocery chemist etc.
ReplyDeleteSince I absolutely LOVE grey and yellow, this is my favorite....so far ! Thank you for your thoughts. I can see so many variations. I love making things for my friends. Thank you. What a great start to 2012 ...giving homemade gifts from Penny !
ReplyDeleteizmir
ReplyDeleteErzurum
Diyarbakır
Tekirdağ
Ankara
66O6Y
sakarya
ReplyDeletedüzce
çankırı
sivas
elazığ
EZLFAC
görüntülüshow
ReplyDeleteücretli show
ADSRLR
01A1A
ReplyDeleteTekirdağ Cam Balkon
Referans Kimliği Nedir
Çankırı Evden Eve Nakliyat
Antalya Evden Eve Nakliyat
Yozgat Evden Eve Nakliyat
A598E
ReplyDeleteAntalya Şehir İçi Nakliyat
Ünye Petek Temizleme
Bayburt Şehirler Arası Nakliyat
Tekirdağ Boya Ustası
Kilis Şehir İçi Nakliyat
Altındağ Parke Ustası
Silivri Parke Ustası
İzmir Şehirler Arası Nakliyat
Yenimahalle Boya Ustası
452E0
ReplyDeletesivas sesli görüntülü sohbet
sohbet
kırıkkale chat sohbet
en iyi ücretsiz sohbet siteleri
uşak tamamen ücretsiz sohbet siteleri
ucretsiz sohbet
ordu parasız görüntülü sohbet
rastgele görüntülü sohbet uygulamaları
adana rastgele sohbet
CD4B1
ReplyDeletebingöl bedava sohbet
artvin sohbet siteleri
Giresun Telefonda Rastgele Sohbet
kadınlarla ücretsiz sohbet
görüntülü sohbet siteleri
trabzon parasız görüntülü sohbet
Erzincan En İyi Sesli Sohbet Uygulamaları
aydın rastgele görüntülü sohbet uygulaması
çankırı sohbet odaları
FGHGFH
ReplyDeleteشركة تسليك مجاري
شركة صيانة افران e0rUGEiNGe
ReplyDeleteشركة مكافحة حشرات بالاحساء R0xLXEzTIy
ReplyDeleteمكافحة الحشرات بالاحساء 6meGn13d2o
ReplyDeletehttps://elrokn-elmethaly.com/%d8%b4%d8%b1%d9%83%d8%a9-%d9%84%d8%ad%d8%a7%d9%85-%d9%88%d8%b5%d9%8a%d8%a7%d9%86%d8%a9-%d8%ae%d8%b2%d8%a7%d9%86%d8%a7%d8%aa-%d8%a8%d8%a8%d8%b1%d9%8a%d8%af%d8%a9/ alXR7Is6h2
ReplyDeleteشركة تسليك مجاري بالقطيف BrbC58WMMY
ReplyDeleteشركة تسليك مجاري بالدمام GhW0PdwtiV
ReplyDeleteشركة صيانة خزانات L5F8wUa9Xs
ReplyDeleteAA949FD5E5
ReplyDeleteinstagram yabancı takipçi
21F6C450CB
ReplyDeleteins bot basma
D3F0CCE62A
ReplyDeletetakipci satin alma instagram
51DFE973ED
ReplyDeleteturk takipci
64BAB05FDF
ReplyDeletetürk takipçi satın al
Viking Rise Hediye Kodu
Yalla Hediye Kodu
Dragon City Elmas Kodu
Dude Theft Wars Para Kodu
Türkiye Posta Kodu
PK XD Elmas Kodu
Google Yorum Satın Al
Roblox Şarkı Kodları
D29E4B2139
ReplyDeleteig takipçi
youtube beğeni satın al
mobil ödeme takipçi
twitter takipçi
güvenilir takipçi