Wednesday, March 2, 2016

Flower Filled Walk

Today I took a walk in downtown SLO.  It was warm (73), sunny and there were beautiful flowers all around.  I captured a few of them.


Thursday, July 12, 2012

DIY Beach Bottles

Hi Friends,
Last week while perusing Pintrest, I came across this pic.  Click the word this to go to the Pin on Pintrest, or the picture to go to the original place it was pinned from (Elizabeth Matthews Gallery on Picasa).


DIY Beach glass????  I had to try it.  Whenever I am at the beach I am always looking for some little beach glass treasure.  So the idea of creating my own beachy treasure, was very exciting.

I had this bottle that I decided to try it out on.  I got it from Pier 1 a couple of years ago to serve homemade lemonade in (which was a perfect use at the time) and haven't really used it since then.  

  
The pin on Pintrest says "DIY faux beach glass- Elmer's Glue poured into a cup and then added small amounts of Wilton's Food Coloring until I liked the color Then I used a soft paint brush . You don't need a sealer."

I didn't have any Elmer's Glue so I decided to try it with Modpodge.  I used the food coloring that I had on hand and mixed it into the modpodge.  I wanted a kind of olive-y green so I added some green and a bit of yellow.  It was a little hard to tell what the color would be when it dried, since the glue is white.  So, I just made it a little darker than I wanted it to turn out.  


Then I painted the mixture right onto the bottle.  


I let it dry completely between coats.  I applied three coats.  I was experimenting with layers to try to get rid of the little lines that were caused by my paint brush.  I wasn't able to completely get rid of them, but I did learn to live with them because I liked the final look.


I tried a turquoise color on a Jack Daniel's bottle that I scored recently at a wedding.  I couldn't resist the cool shape so I asked if I could have the empty bottle.  You can see the brush lines a little more on the turquoise bottle.  I'm not sure if it's the color or because the bottle was smoother.  But, I love my little beach bottle collection.  I have them sitting on the counter in my kitchen and they make me smile.


 Hope you enjoy them too!

Tuesday, April 17, 2012

Cheerful Wreath

Hello friends, today is such a beautiful spring day here in Central California!  So I wanted to do something colorful and happy.

This colorful wreath is my latest creation.  


I made it using the Felt Flower in THIS TUTORIAL. (Click if you want to go there)  I am not sure yet what I am going to do to finish it, or if I am going to leave it as is.  I had a suggestion to add a "Happy Birthday" plaque.  I was also thinking it might be cute to a little framed chalkboard to it so it could be used for any celebration, or just everyday cheer.

Here's how I made it.

1.  Wrapped a straw wreath in felt strips, using hot glue.
2.  Cut 21 (9x12) sheets of eco-felt (3 sheets of each color).  I cut the sheet of felt in half and then in half
     again, leaving me with four 9x3 inch strips.
3.  Made rolled flowers out of the felt strips using THIS TUTORIAL. (Click to go there)
4.  Hot Glued the flowers on the wreath in a random order.
5.  I made a hanger out of a strip of felt and glued it to the back.
6.  Covered the bottom of the hanger to make it stronger by hot-gluing a rectangle of felt
     over it.

Here is a quick pic of my hanger on the back.


That's it!  Please let me know what you think, and if you think I should add anything to finish it off.


Thanks for stopping by,

I may link this project to any or all of these Link Parties.  Check them out!
Kuzak’s Closet,   Marvelously Messy,   Under the Table and Dreaming,   The Tattered Tag,   Flamingo Toes,   Lamb Around,   Cherished Treasures,  Petite Hermine,   Nifty Thrifty Things,  Skip to my Lou,   Sumo’s Sweet Stuff,  Making the World Cuter,   The Girl Creative,   Singing Three Little Birds,   Mad in Crafts,   11th Heaven’s Homemaking Haven,   Craftomaniac,   Creating My Way to Success,   Sew Can Do,   Embellishing Life,   C.R.A.F.T.,   It’s a Blog Party,   Me Making Do,   Sarahndipities,   The DIY Home Sweet Home Project,   Funky Polka Dot Giraffe,   Today’s Creative Blog,   Hope Studios,         Ladybug Blessings,   Tip Junkie,   A Silly Little Sparrow,   Giggles Glitz & Glam,   Not JUST a Housewife,   Reason’s to Skip the Housework,   Little Birdie Blog,   The Blackberry Vine,   Blue Cricket,   The Trendy Treehouse,   Lil’ Luna,   The Thrifty Home,   Seven Thirty Three,   Sew Much Ado,   Handyman Craftywoman,   Sweet Craft Cakes,   Tea Rose Home,    Twin Dragonfly Designs,   Elements Interiors,   Fun to Craft,   The Shabby Chic Cottage,    House of Hepworth’s,   Somewhat Simple,   Rhinestone Beagle,   Yesterday on Tuesday,   Kojo Designs,   While He Was Napping,   Tatertots and Jello,   Bubbly Nature Creations,   Funky Junk Interiors,   Creation Corner,    A Few of my Favorite Things,   It’s a Hodgepodge Life,   My Romantic Home,   The Shabby Nest,    Frugal and Fabulous Design,   Sun Scholars,      Whipperberry,   At the Picket Fence,  Fingerprints on the Fridge,   Home Sweet Farm,   Young & Crafty,   Freckled Laundry,   Iron Violet Designs,   Fireflies & Jellybeans,   Be Different Act Normal,    Craft Envy,    Along for the Ride,   A Vision to Remember,    Saturday Mornings,   It’s a Crafty Life,   Childmade,     Sew Can Do,  

Tuesday, March 6, 2012

Krysti Time

This week is really feels like spring here in central California.  So, I decided to make something bright and cheerful.  I have an incredible friend, named Kelly Brockett, who sent me a box full of things I can use to be creative.  One of the many amazing treasures was a Charm Pack called "Teal We Meet Again" by Keepsake Quilting.  I used that little treasure and created this wreath.


I also used some of the amazing scrapbook paper that she sent me in my new Cricut to create this adorable sign for my daughter's 4th Birthday Party.  It was a Willy Wonka extravaganza and I will post more about it when I get all of the pictures uploaded.


I am so thankful for all of the wonderful people in my life who support my creative endeavors.  


This post may be linked to any or all of the following parties:

Kuzak’s Closet,   Marvelously Messy,   Under the Table and Dreaming,   The Tattered Tag,   Flamingo Toes,   Lamb Around,   Cherished Treasures,  Petite Hermine,   Nifty Thrifty Things,  Skip to my Lou,   Sumo’s Sweet Stuff,  Making the World Cuter,   The Girl Creative,   Singing Three Little Birds,   Mad in Crafts,   11th Heaven’s Homemaking Haven,   Craftomaniac,   Creating My Way to Success,   Sew Can Do,   Embellishing Life,   C.R.A.F.T.,   It’s a Blog Party,   Me Making Do,   Sarahndipities,   The DIY Home Sweet Home Project,   Funky Polka Dot Giraffe,   Today’s Creative Blog,   Hope Studios,         Ladybug Blessings,   Tip Junkie,   A Silly Little Sparrow,   Giggles Glitz & Glam,   Not JUST a Housewife,   Reason’s to Skip the Housework,   Little Birdie Blog,   The Blackberry Vine,   Blue Cricket,   The Trendy Treehouse,   Lil’ Luna,   The Thrifty Home,   Seven Thirty Three,   Sew Much Ado,   Handyman Craftywoman,   Sweet Craft Cakes,   Tea Rose Home,    Twin Dragonfly Designs,   Elements Interiors,   Fun to Craft,   The Shabby Chic Cottage,    House of Hepworth’s,   Somewhat Simple,   Rhinestone Beagle,   Yesterday on Tuesday,   Kojo Designs,   While He Was Napping,   Tatertots and Jello,   Bubbly Nature Creations,   Funky Junk Interiors,   Creation Corner,    A Few of my Favorite Things,   It’s a Hodgepodge Life,   My Romantic Home,   The Shabby Nest,    Frugal and Fabulous Design,   Sun Scholars,      Whipperberry,   At the Picket Fence,  Fingerprints on the Fridge,   Home Sweet Farm,   Young & Crafty,   Freckled Laundry,   Iron Violet Designs,   Fireflies & Jellybeans,   Be Different Act Normal,    Craft Envy,    Along for the Ride,   A Vision to Remember,    Saturday Mornings,   It’s a Crafty Life,   Childmade,     Sew Can Do

Wednesday, January 4, 2012

Blissful Meandering Giveaway at A Beautiful Life

So exciting!!!!!  

Sarah over at A Beautiful Life is hosting a giveaway week.  I have joined the fun and will give away one item from my Etsy store to the winner.  She will choose a winner using random.org this Saturday, January 8, 2012.  She has a great blog and I am honored to be a part of her giveaway week.


You can check out the giveaway here:


Tuesday, January 3, 2012

Pink and Gray Valentine's Day Wreath

Last night, I was in Joann's and just couldn't pass up this adorable fuzzy fabric.


So, since it's kinda pricey I was trying to think of what I could do with a small amount.  A few weeks ago, during worship, I thought of making a wreath using a fabric tube.  Lots of times during worship, my mind wanders to some kind of creative place and this idea just seemed to jump out at me last night.  

I have been making wreaths out of foam pipe insulation from Osh thanks to this pin on Pintrest. 
(BTW, I must confess that I am COMPLETELY in love with and addicted to Pintrest.)


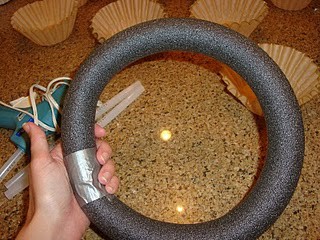
Tip:  I have found that the pipe insulation that works best for me, without kinking, is 3/4 inch with a 3/4 inch wall.


  Since the wreath begins life as a tube and not a ring, it worked perfectly to cover it in a fabric tube.  

I started with 1/4 of a yard of this fabulous fabric.  I folded it right sides together and used my sewing machine to sew the length of the fabric together.  I'm sorry, but I didn't take a pic. :(

The last time I bought pipe insulation, I accidentally bought it a size bigger that I usually do.  So, it was quite the wrestling match getting my fuzzy fabric tube onto the foam pipe insulation.  Hehehe

But, after pulling and tugging for a while, it was a success and I was able to duct tape the ends together to form my wreath.  I made some felt flowers and added them.  I made a little hanger for the back and tada.  Here it is!


I really like it!  There is something so wintery about it, which wasn't intended, but makes me happy.

Thursday, December 29, 2011

Bright Valentine's Day Wreath

Well, I started out making this wreath as a Valentine's day wreath.  I had some flannel left over from a project I made for the Yard Supervisors at our school.  (Hand Warmers)  So, I cut the fabric into rectangles with my pinking shears.  I wrapped each piece around the end of a pencil and glued them onto a straw wreath form.  I used THIS tutorial from My Greenbrae Cottage.  Wow, that took a REALLY long time.  When I was finished, it just needed something more. So, I experimented with flowers.  I tried sticking to the traditional Valentine's Day colors but they really didn't pop.  So, I decided to go with bright colors, and here is the result!  I'm not sure that I am finished with it yet.  I feel like it needs a little something more, but for now.....


Okay, it's been a few days and I have added a couple more flowers.  
Here is the updated version.