Tuesday, April 26, 2011

Redressed Shelves

Hi friends!  I am so excited to share this project.  A few years ago a dear friend gave me two sets of square shelves. (You're the best Kelly B.)  I loved the idea of being able to do something crafty with them.  They have been sitting in my "to do" crafty stash ever since.  Whenever I would see them, I would start brainstorming but could never quite commit to a project.

Well, last night I was overcome by my love for some of the scrapbook papers that I have.  I love patterns!  I also impulsively buy scrapbook paper that has a pattern that I like, even though I am doing all of my scrap-booking digitally these days.  That is where these shelves come in.  I was wishing that I could use the paper in a project that I could admire daily and not tuck away in a bookshelf.  Then it hit me, The Square Shelves from Kelly!


Here they are before.


The first thing I did was paint the front edges of the shelves, the inside and about an inch of the outside.


Instead of measuring the shelves to cut the scrapbook paper, I just placed it on top and creased it.  (Confession:  I am a shortcut girl)


Then I cut along the crease.  I used the piece I had cut as a template to cut the other three pieces for each shelf.


I didn't have any official decoupage product, so I made my own.  I mixed 1/2 cup of tacky glue with 3 tablespoons of warm water.  I added the water one tablespoon at a time, mixing it in between.  I brushed the mixture on the shelf and placed the paper along the outside.  Once all of the paper was placed I brushed more of the mixture over the top of the paper until it was saturated, but not dripping.  I did two sets, one for my bedroom and one for my living room.

Here is how they turned out.

This is the set in my bedroom!


This is the set in my living room!


I'm so thrilled!  I love them.  Now I can see some of my favorite scrapbook papers every day.

Sunday, April 17, 2011

Monday Meandering #7

Springtime has definitely gotten everyones creativity flowing.  Blogland was full of fabulousness this weekend.  This weekend, in addition to my blissful meandering through blogland, I also got to do some blissful meandering at the beach.  I collected lots of little treasures from the beach and can't wait to use them in some kind of crafty way.

As I was collecting sticks, shells and rocks from the beach, my daughter decided that she wanted to collect something too.  Hehehe.  Thankfully, I was able to talk her out of this log and into a little rock.


Now onto what I found in blogland.
Reminder: Click on the picture for a link to the project and the name of the blog for a link to their homepage.

Personalized Robin's Eggs by Kristy Makes.  Aren't these just adorable?


Popsicle Stick Bracelets by Suzy's Artsy-Craftsy Sitcom. I had no idea you could bend sticks like this.  These are so cool!  I might try them with my Kindergarteners for Mother's Day.
 

Popsicle Banner by Naptime Journal.  This fun banner just screams "Summer is coming."


Trumeau Mirror by Blue Roof Cabin.  I think this is such a beautiful mirror.


Ladder Laundry Rack by Little Lucy Lu.  I am in love with this idea.  Using ladders in design and decorating is so fun to me.


Chalkboard Wedding Plate by Fancy Frugal Life.  Isn't this pretty?  I can't wait until the next wedding I'm invited to so I can make this as a gift.


Thank you for stopping by.

Saturday, April 16, 2011

"Country" Sign Upcycle

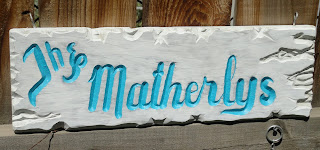
When we were married, many years ago, I couldn't wait to get to the County Fair that year and buy a name sign.  I had admired them for years and had these great dreams of adding names to it as we had children.  Well, I lost some of the romanticism of the idea when we had been married for 12 years and still had no children. :(  It lost a lot more since over the years, my decorating style has changed about a million times and the "country sign" from the mid 90's was old and outdated.  It has spent the last few years sitting on our patio, being rained on and basically forgotten about.  But, for some reason this week it caught my eye and I had the desire to Upcycle it.

This is how it looked after years of waiting to be rediscovered.


First, I cleaned it up a bit, and painted the inside of the writing.


Next, I painted the "burnt look" grooves off white.


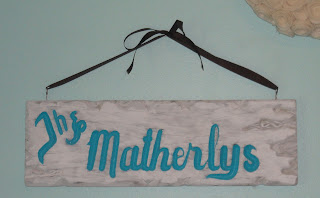
Finally, I watered down some white paint and washed the front.  I tried to be careful, but I had to retouch most of the letters as I got white on the edges.


I added it to my Beach themed bedroom.


Please excuse the brown ribbon.  I have plans to get some rope to hang it so it will look a little more "beachy".  To my surprise, my hubby was really excited about it.  I didn't realize that he had an emotional attachment to the sign too. 
 I guess because it's the name that he got to share with me and our beautiful daughter, who we finally met on year 13.   (She was soooo worth the wait.)


HookingupwithHoH

Friday, April 15, 2011

Beachy Wreath Giveaway Winner!!!!!

The winner of the Beachy Wreath Giveaway is comment #5


Mamasita said...

Krysti,
First of all CONGRATS on reaching 100 followers! That has got to feel AWESOME!
Second of all I adore the wreath AND it's "Beachy-ness" - we are moving our bedroom downstairs and it's going to be a "Beach Theme" - think I mentioned that in your original wreath post! :-) Love it!
Hope you are having a fantastic week!!!
Again, CONGRATS!!!! And thanks for being one of my followers too!
Lots of love,
Maggie

Congratulations Maggie!
I hope you love your wreath as much as I love mine.

Please email me your mailing address.  blissfulmeandering@gmail.com

Thank you to all of you left comments on my little giveaway.  Your kind words are so special to me.

Tuesday, April 12, 2011

100 Followers Giveaway!

I am soooooooo thankful that I officially have 100 followers.  

In honor of this fabulous occasion I am having a giveaway.  I looked at my previous tutorials and the post that has been viewed the most is my Beachy Wreath.  So, I am going to make one to give away.  If you are interested in winning this wreath, please tell me why in the comments.


A winner will be announced on Friday.
Please leave your name and your email in the comment so I can contact you.

Again, I just have to say THANK YOU for following my blog!


Monday, April 11, 2011

Meandering Monday #6

There are some fabulous things going on out there in blogland this week.  I had a lot of fun looking around the link parties and choosing things that I loved to share with you today.

My little family LOVES going to the beach whenever we can.   So, when I saw this first project, I thought it was so genius and fun.

Sea Shell Plaster Mold


Since it is finally starting to feel like Spring here in Central California, I just couldn't help falling in love with this adorable sign by Creative "Try"als.


I haven't done any real "spring" decorating yet, but when I do, this fun wreath by An Ever Growing List will definitely be at the top of My list.  (No pun intended, at first. Hehehe)


There are an uncountable number of adorable Easter projects in blogland right now.  This little cutie, called Driving Miss Peeps by Nothing but Country is just too adorable to miss out on. 


 Since we are girly girls out my house, I think we might use a Pink Bunny.  Thanks for stopping by.

Thursday, April 7, 2011

Felt Gardenia

This week, I am in a mad frenzy of creating items for a friend to sell at a craft show.  I have to say, it was hard to slow down for a while and take pics.  But, once I finished this Gardenia looking flower, I decided that I had to make another one for the blog.  The tutorial is very similar to the flower used in the pink and orange headband.  Actually there are only a couple of differences.  But, I thought that the flower looked different enough to do another tutorial because I wanted to share it.


I started with the supplies: Flower templates (click for template), 9x12 piece of felt, scissors, glue stick and glue gun.


Cut four of the large flowers using the template.


Next, cut one of the small flowers and the circles using the templates.


Fold the first large flower in half.  I added a little hot glue inside to hold it together.


Then fold it in half again.


Repeat this with the remaining 3 large flowers.


Glue to folded flowers around the circle, making sure that they are touching in the center.


Cut the small flower petals apart, so that they will fluff up.


Glue the small flower in the center.


Finally, I put a dab of hot glue in the center and pressed black seed beads in it.


I made one in White (which is why I called it a Gardenia), one in gray and one in purple.


The parties I am linking to are on the sidebar of my blog.

I am listing this one for the pure joy of Kim at Today's Creative Blog.
Get Your Craft On Tuesday